
 Author:
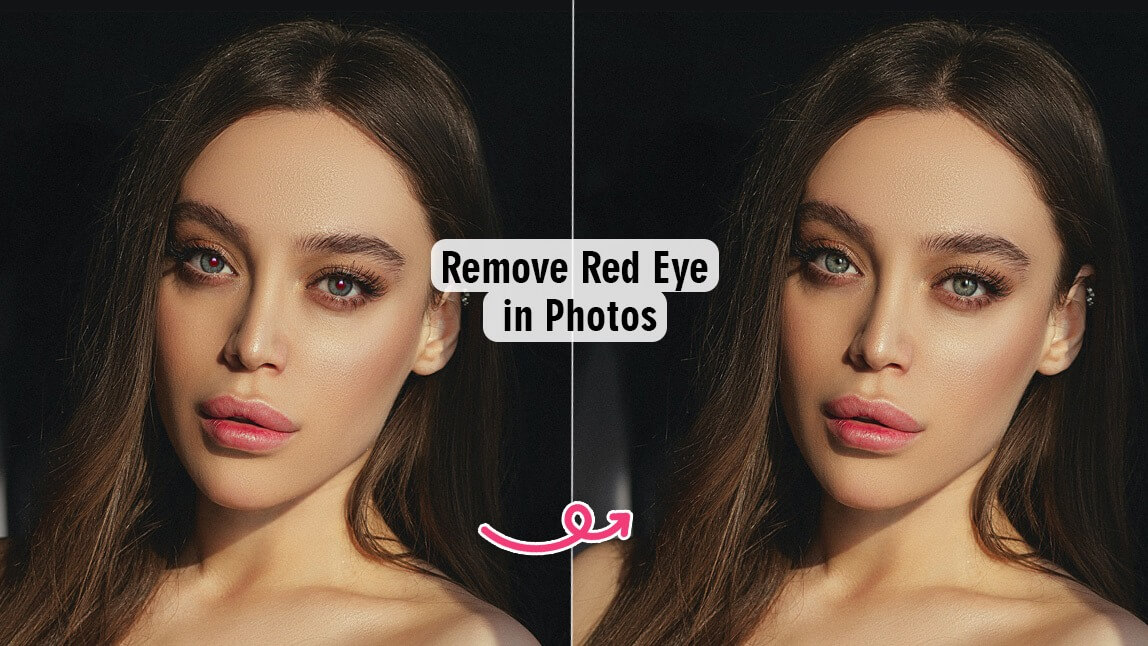
Have you ever taken what you thought was the perfect photo, only to notice those glowing red pupils staring back at you later? That’s the red eye effect, a classic issue caused by flash photography in dark environments. While it’s common, it can instantly ruin an otherwise beautiful shot. The good news? Fixing it is easier than ever.
In this guide, you’ll learn exactly what causes the red eye effect in photos, how to prevent it before it happens, and the best way to remove red eye instantly with YouCam Makeup.
What Is the Red Eye Effect in Photos?

The red eye effect is one of the most common photo problems and one of the easiest to fix. You’ve probably seen it before: you snap a picture at night or in a dim room, and suddenly, your subject’s eyes are glowing red.
This happens because when a flash fires in low light, your subject’s pupils are wide open. The flash travels through the pupil, reflects off the blood vessels at the back of the eye, and returns directly to the camera lens, giving that eerie red glow.
It’s not dangerous, of course — but it can make even the best photos look unnatural.
Why Does Red Eye Happen More Often in Flash Photography?
The closer your camera’s flash is to the lens, the higher the chance of red eye. That’s why you see it often in smartphone photos or compact cameras. When the flash and lens are almost on the same axis, the light has a straight path in and out of the eyes.
You’ll notice red eye occurs most often when:
- You’re shooting in dim lighting or indoors at night
- The flash is close to the lens (like a phone camera)
- The subject is looking directly at the camera
- The subject’s pupils are dilated (larger due to darkness or alcohol consumption)
How to Prevent Red Eye Effect Before It Happens
A few quick adjustments can make a big difference in preventing red eye in the first place.
- 1. Turn on More Lights
- 2. Avoid Direct Flash
- 3. Try Red Eye Reduction Mode
- 4. Ask the Subject to Look Slightly Away
1. Turn on More Lights
Brighter environments help pupils contract, reducing the reflection that causes red eye. If you’re indoors, simply turn on another lamp or two before taking the photo.
2. Avoid Direct Flash
Whenever possible, use natural light or indirect lighting. You can also use an external flash or bounce your flash off a ceiling or wall to diffuse the light.
3. Try Red Eye Reduction Mode
Most smartphone and camera flashes have a red-eye reduction mode that emits a pre-flash before the main one. This brief flash makes pupils contract, minimizing the reflection that causes red eyes.
4. Ask the Subject to Look Slightly Away
Red eye only happens when the person is looking directly into the camera lens. Ask them to look slightly to the side for a natural pose that also prevents red eye.
How to Remove Red Eye Effect in Photos with Red Eye Remover App
Even with the best precautions, you’ll sometimes still get red eyes in your favorite shots. Luckily, you don’t need to open Photoshop or spend time with complicated editing tools.
YouCam Makeup is one of the best free apps to instantly correct red eyes using AI. It’s designed for effortless photo touch-ups, from makeup filters to skin smoothing — and yes, red eye correction too.
Step 1. Download YouCam Makeup from the App Store or Google Play.

Step 2. Upload the photo you want to fix.
Step 3. Tap “Retouch” and find the “Red Eye” tool.

Step 4. Let the AI automatically detect and remove red eyes from your photo.
Step 5. Save your photo — your eyes will instantly look natural and bright.
YouCam Makeup’s red eye remover works with precision, adjusting the color of the pupils without over-darkening or losing detail. The correction looks realistic, unlike older editing tools that leave a flat, painted look.
Why YouCam Makeup Is the Best Red Eye Remover
- AI-powered precision: Automatically detects red eyes and restores natural tones.
- Realistic results: Keeps the sparkle and contrast of your eyes intact.
- All-in-one editor: Beyond red-eye correction, you can smooth skin, adjust lighting, or even add makeup filters in one app.
- Free to try: You can test it instantly with your photos before saving your edits.
Combine Red Eye Removal with Other Retouch Tools
After removing the red eye effect, enhance your overall photo with a few finishing touches:
- Change eye color using the Eye Color feature.
- Even out lighting using “Color Correction” or “Auto Enhance.”
- Add subtle makeup filters to make your photo look polished but natural.

A small edit can completely transform your photo while keeping it authentic and flattering.
Other Ways to Fix Red Eye Manually
If you prefer manual editing, you can also correct red eyes using desktop or mobile software:
- Photoshop or Lightroom: Use the “Red Eye Tool” under retouch options. Click directly on the red area to neutralize it.
- Apple Photos App: On iPhone, open your photo, tap Edit, then use the “Red Eye” correction tool.
- Google Photos: Some Android devices include a red eye fix under Edit > Tools.
These tools work fine, but they take longer and don’t always deliver consistent results — especially if the lighting varies across your photo.
That’s why AI photo editing apps like YouCam Makeup are becoming the go-to choice for effortless, natural edits.
Remove Red Eye from Photo with YouCam Makeup
The red eye effect in photos is one of those classic flash photography flaws that everyone has dealt with — but it’s also one of the easiest to fix. With the help of modern AI tools like YouCam Makeup, you can remove red eye effect in just a few taps and bring your photos back to life.
Whether you’re cleaning up an old family album or perfecting your latest selfie, you no longer need to worry about those spooky red pupils ruining the moment.
About the Editors

The PERFECT Corp. Editorial Team
We are a team of experts on photo and video editing apps. Our goal is to deliver engaging content on everything from stunning selfie edits to eye-catching video effects. We cover the latest trends and share niche tips to help you master digital creation.
Red Eye Effect in Photos FAQs
How to get rid of red eye effect?
The fastest way to get rid of red eye effect is to use a red eye remover app like YouCam Makeup. Just upload your photo, let the app detect the red pupils, and it will automatically restore them to a natural color in seconds. You can also manually fix red eye in editing tools like Photoshop, Lightroom, or the built-in photo editor on your phone.
How will you remove a red eye defect in an image?
To remove a red eye defect, use an image editor with a specific “Red Eye” correction tool. For example, in YouCam Makeup:
- Open the app and upload your photo.
- Tap Retouch and select Red Eye.
- The AI will automatically correct the color and brightness of your eyes.
- Save the edited image.
This process takes only a few seconds and keeps your eyes looking natural.
What is the app that removes red eyes?
The best app to remove red eyes is YouCam Makeup. It’s free to download on iPhone and Android and uses advanced AI to instantly correct red pupils without affecting the rest of your photo. It also includes other editing tools for makeup, skin retouching, and lighting adjustments — so your entire photo looks flawless.
Can you fix red eye on iPhone photos?
Yes! If you’re using an iPhone, you can fix red eye directly in the Photos app:
- Open the image in the Photos app.
- Tap Edit, then select the Red Eye Correction tool (the eye icon with a slash).
- Tap each red eye to correct it.
Alternatively, you can use apps like YouCam Makeup for even faster and more precise results.
How to get the red-eye effect in photos?
If you actually want to create the red-eye effect for a creative or spooky look, you can do it by taking photos in a dark room using flash while looking directly at the camera. The low-light environment keeps your pupils dilated, which makes the flash reflect off the back of your eyes, creating that red glow. You can also use photo editing apps to simulate the effect artificially.
What does it mean if eyes are red in photos?
If your eyes appear red in photos, it’s because the flash reflected off the blood vessels in the retina at the back of your eye. It’s completely normal and doesn’t indicate any eye problem — it’s simply a result of camera lighting and flash angles.
Why don't I get red-eye in photos?
You might not get red eyes in photos because your camera or phone automatically uses red-eye reduction mode, or the lighting in your environment is bright enough to keep your pupils small. It can also depend on the angle of the flash or how far you are from the camera. Some newer phone cameras even use AI flash correction to eliminate red eyes automatically.


